Cranberry Jam
Makes about 2 cups (600g)
Ingredients
- 2 1/2 cups (about 10oz) (280g) fresh cranberries, thawed if frozen
- 1 1/4 cups (265g) granulated sugar
- 1 cinnamon stick
- 2 Tbsp (30ml) Campari, optional
- 2 Tbsp (30ml) orange liqueur, such as Triple Sec
- 1 pinch ground cloves
Storage
-
Store the jam in a covered container in the refrigerator for up to 2 months.
Swiss Meringue Buttercream
Makes about 3 cups (500g)
Ingredients
- 3 large egg whites
- 3/4 cup (159g) granulated sugar
- 1/2 tsp (1.5g) coarse salt
- 1 cup (2 sticks) (226g) unsalted butter, cut into 1-inch pieces and softened
- 1 Tbsp (15ml) pure vanilla extract, optional
Storage
- Unflavored buttercream can be stored in an airtight container at room temperature for up to 1 day or refrigerated for up to 1 week. Before using, bring to room temperature and beat lightly by hand or with an electric mixer fitted with the paddle attachment until smooth. Buttercream that has been flavored with perishable items, such as fresh fruit or preserves, should be kept at room temperature for no more than a few hours, or stored in an airtight container in the refrigerator for up to 1 week.
Tip: Flavoring Buttercream
- You can easily flavor this buttercream with additional extracts, jam, or custards (as I do for the Cranberry Yule Log) by beating them in with the paddle attachment in step 4, above.
Chocolate Custard
Serves 12 to 15
Ingredients
For the chocolate custard- 2 Tbsp (10g) unsweetened cocoa powder, preferably Dutch-processed
- 1 Tbsp (8g) cornstarch
- 1 pinch coarse salt
- 1/2 cup (125ml) whole milk
- 3 oz (85g) best-quality dark chocolate, 70% to 80% cacao, finely chopped
- 2 Tbsp (30ml) orange liqueur, such as Triple Sec
- 1 recipe Perfect Chiffon Cake, baked and cooled as a roulade, chilled
- 3/4 cup (225g) Cranberry Jam
- 1 recipe Swiss Meringue Buttercream, room temperature
- finely chopped pistachios, for garnish
Storage
- The assembled cake will keep for 2 or 3 days in the refrigerator, loosely covered.
Perfect Chiffon Cake
Makes two 8-inch Cake Layers or One 13 x 18-Inch Sheet Cake for a Roulade
Ingredients
- Non-stick pan spray and flour, for greasing the pan
- 1 1/2 cups (170g) cake flour
- 1/2 tsp (1.5g) coarse salt
- 1/4 tsp (1.5g) baking soda
- 6 large eggs, separated
- 1 cup (212g) granulated sugar, divided
- 1 Tbsp (15ml) pure vanilla extract
- 1/4 cup (62ml) neutral oil, such as safflower
- 1/2 cup (125ml) buttermilk
- confectioners’ sugar, for dusting (if you’re making a roulade)
Storage
- The cooled cakes can be used immediately or wrapped and refrigerated for up to 2 days. Round layers can be frozen for up to 1 month. I wouldn’t recommend freezing roulades, as they are apt to crack.

Yule logs are dauntingly impressive but manageable when you break them down into steps. This is my favorite type of project because the payoff really outweighs the effort, especially if you begin making the components a few days in advance. Most of the individual steps can be accomplished in the evening without much fuss, leaving you with little to do but assemble and decorate the cake on the final day. Here’s how I might go about it:
Day 1, or even a week ahead: Make the Cranberry Jam.
Day 2: Make the Swiss Meringue Buttercream.
Day 3: Make the chocolate custard and refrigerate overnight. Pull the buttercream out of the refrigerator just before bed so that it’s ready to use the next day.
Day 4, morning: Bake and cool the Perfect Chiffon Cake. Pull the chocolate custard out of the refrigerator to come to room temperature. Meanwhile, go for a walk in the park to see what real logs look like.
Day 4, early afternoon: Fill the cake with the Cranberry Jam and flavor the buttercream with the chocolate custard.
Day 4, midafternoon: Finish assembling and decorating the cake, then refrigerate it until your guests arrive, or even for a day or two.
Recipe by Jason Schreiber
Jason Schreiber is a New York City-based food stylist and cookbook author whose specialty is pastry.
Cranberry Jam
Bracingly tart, this jam serves as the filling for the Cranberry Yule Log but is equally delicious on buttered dark toast.
Instructions
Step 1
In a medium saucepan, combine all the ingredients with 1/2 cup (125ml) water. Bring to a boil over medium-high heat, stirring until the sugar dissolves, about 3 minutes. The mixture will foam up dramatically and then subside.
Step 2
Continue boiling, stirring frequently, until the mixture is deep red and thick enough to cling to a spoon, 8 to 10 minutes.
Step 3
Remove the cinnamon stick. Transfer the jam to a food processor and pulse until relatively, but not completely, smooth, about 1 minute. Scrape into a heatproof bowl and cool completely before using.
Swiss Meringue Buttercream
This is my go-to frosting whenever I want luxurious swoops and swirls that can hold up to whatever life throws at it. You’ll need one batch for the Cranberry Yule Log.
Instructions
Step 1
Make the Swiss meringue: In the bowl of an electric mixer, whisk the egg whites, sugar, and salt until the sugar has been completely moistened. Place the bowl over a pan of gently simmering water and heat, whisking frequently, until the sugar dissolves and the mixture is hot to the touch (160°F, 71°C), about 3 minutes.
Step 2
Transfer the bowl to the mixer fitted with the whisk attachment. Whip on high speed until the egg whites form stiff peaks and have cooled to just above body temperature, about 5 minutes.
Step 3
Break the meringue: Reduce the mixer speed to medium and begin adding the butter, about 1 tablespoon (14g) at a time. The meringue will collapse as soon as the first bit of butter hits the foam. Continue adding the butter, a little at a time, waiting until the previous addition has more or less been eviscerated before continuing, 30 seconds or so should do it. The meringue will become droopy and soupy, but when all the butter has been added it will snap together, forming a luscious frosting. Scrape down the sides of the bowl and add the vanilla, if using.
Step 4
Switch to the paddle attachment. Beat on low speed for about 1 minute to remove some of the larger air bubbles.
Chocolate Custard
Instructions
Step 1
I think the best way to make a rich chocolate buttercream is with a custard base. Here’s how: In a small saucepan, whisk together the cocoa powder, cornstarch, and salt. Add the milk, a little bit at a time, whisking to form a lump-free paste, then whisk in the rest of the milk until well combined.
Step 2
Place the saucepan over medium heat, whisking constantly until the mixture thickens and begins to boil, about 4 minutes. Off heat, add in the chopped chocolate. Let it soften for about 1 minute, then stir vigorously with a rubber spatula to combine. Transfer to a heatproof bowl and press a piece of plastic film or wax paper onto the surface of the custard to prevent a skin from forming. Let cool to room temperature or refrigerate overnight. (Bring to room temperature before using.)
Step 3
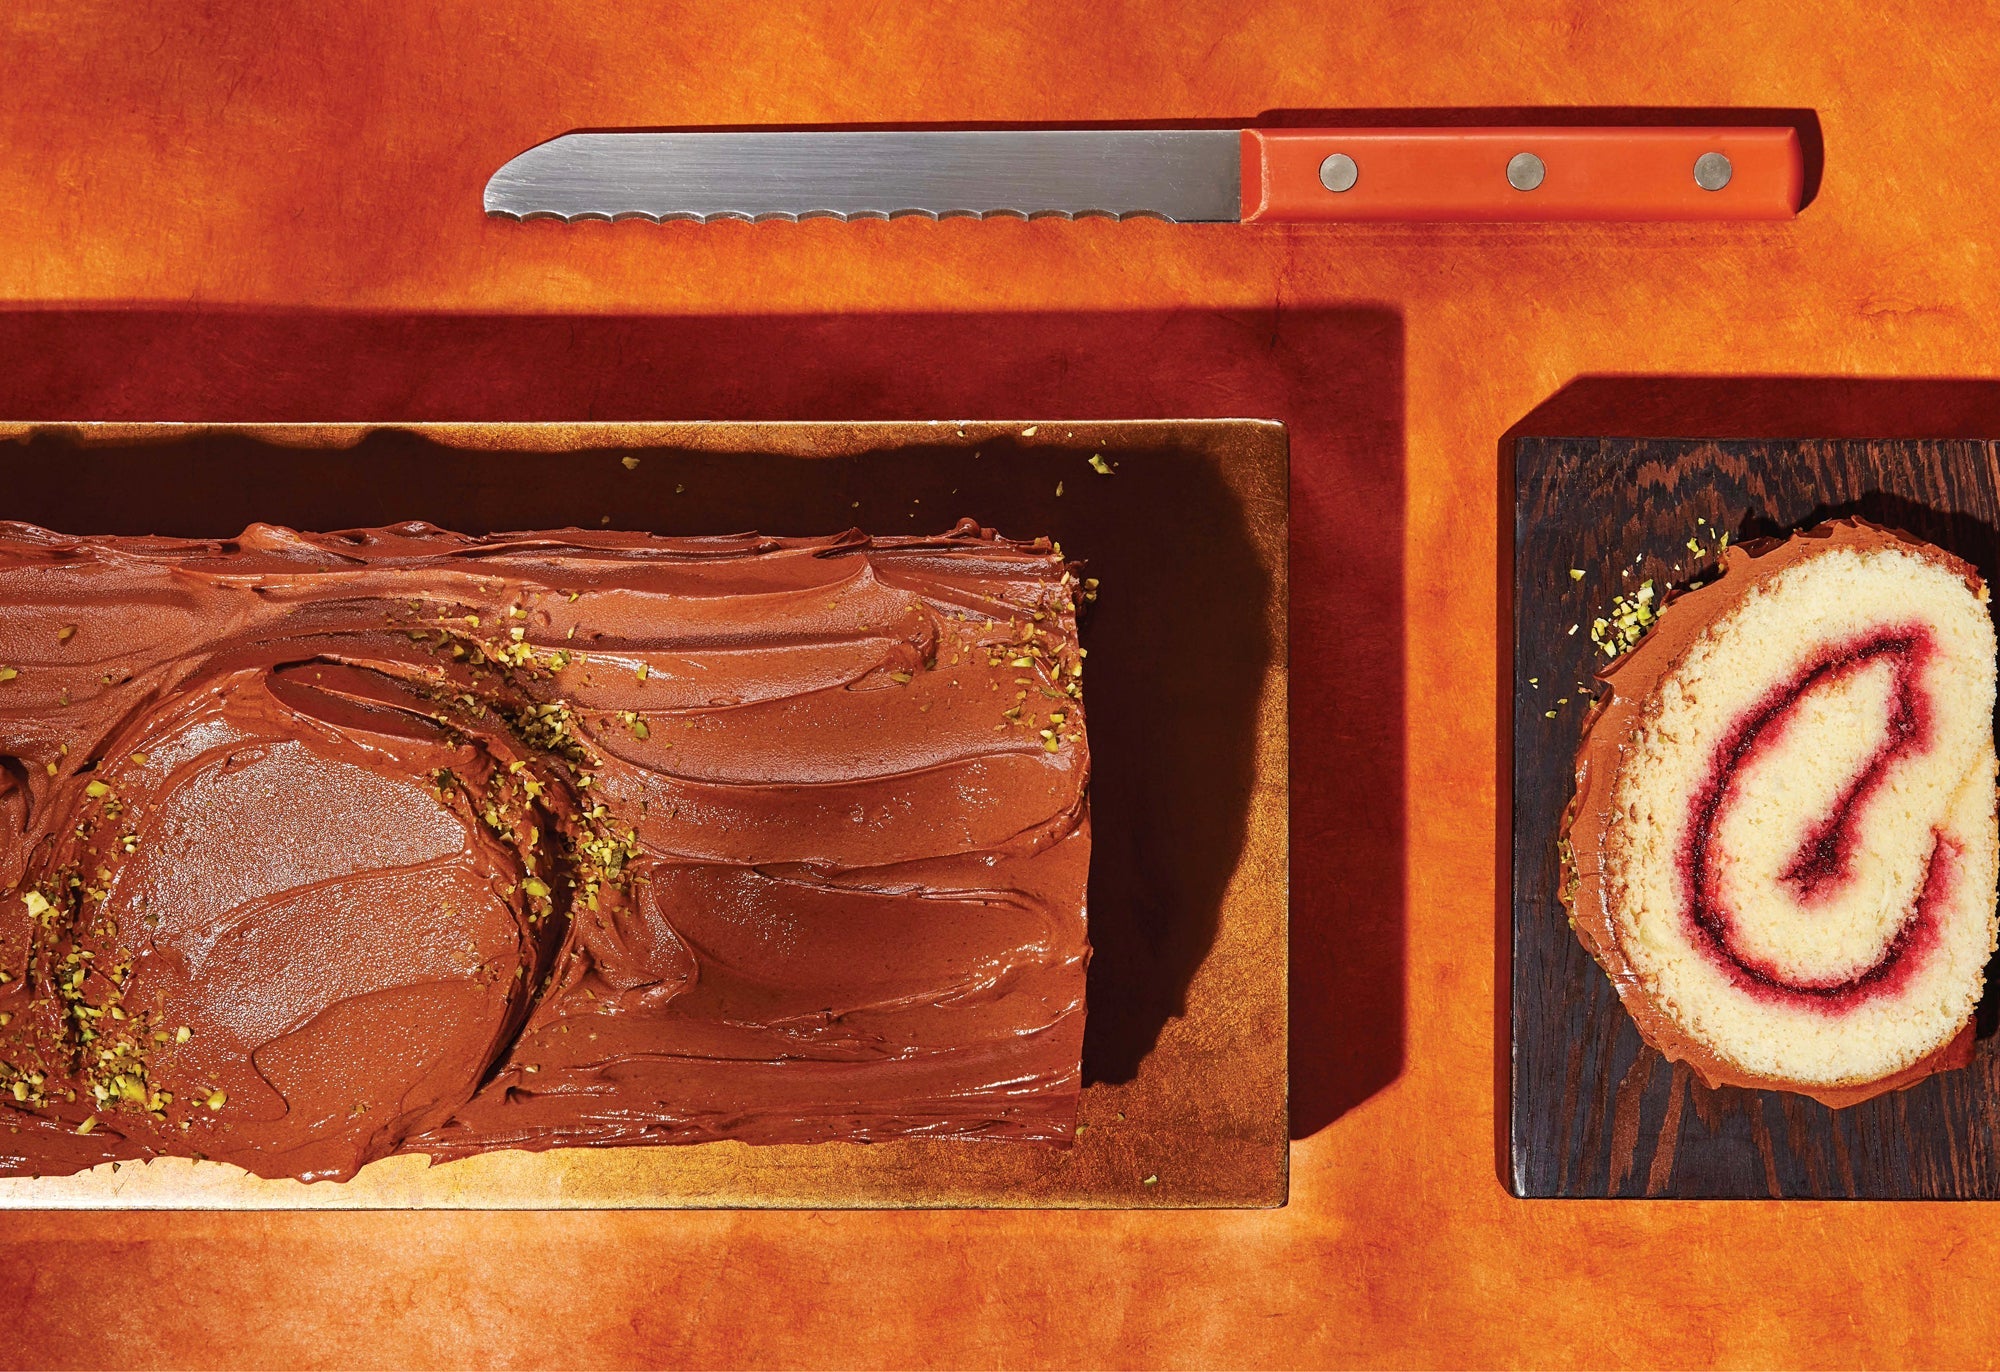
Next, assemble the cake. In a small bowl, stir the orange liqueur together with 1 tablespoon (15ml) water. Gently unroll the cooled chiffon cake, trying as hard as you can not to crack it, but no one will ever know if you do. Brush the surface with the orange liqueur mixture, then use an offset spatula to spread a thin layer of the cranberry jam over the surface of the cake, leaving about a 1/2-inch border around the edges. Gently reroll the cake and transfer it to a serving platter, seam side down.
Step 4
In the bowl of an electric mixer fitted with the paddle attachment, beat the Swiss meringue buttercream and cooled chocolate custard on low speed until combined, stopping occasionally to scrape down the sides of the bowl, about 2 minutes.
Step 5
Use a sharp, serrated knife to trim about 1 inch from each end of the roulade. Use some chocolate buttercream to affix the trimmed pieces to the top and side of the roulade to create the look of cut-off branches. Refrigerate the cake until the frosting firmly holds the pieces in place, about 15 minutes.
Step 6
Use a small offset spatula to frost the cake with the remaining chocolate buttercream, working back and forth lengthwise to create a gnarly, barky texture. If at any point the cake becomes difficult to work with, pop it back in the refrigerator for 15 minutes or so, until the frosting firms up. You can always layer more frosting on top of the bark to create more texture. We’re making a French tree, not an Italian car.
Step 7
When you’re satisfied with the coverage and texture of the chocolate buttercream, refrigerate the cake for about 45 minutes, until the frosting is set.
Step 8
Scatter a moss of finely chopped pistachios into the crevasses. Bring the cake to a cool room temperature before cutting crosswise into thin slices.
Perfect Chiffon Cake
Chiffon cake sounds fussy, but if you follow my lead, you’ll see it’s actually quite easy to throw together.
Instructions
Step 1
Preheat the oven to 350°F (180°C) and select your pans. For round layers, use two 8 x 2-inch round cake pans, greased and floured. For a roulade, use a 13 x 18-inch rimmed baking sheet lined with a silicone baking mat or parchment paper and greased and floured.
Step 2
In a small bowl, whisk together the flour, salt, and baking soda. Set aside.
Step 3
In a large bowl, place the egg yolks and whisk in 1/2 cup (106g) of the granulated sugar, the vanilla, oil, and buttermilk. Set aside.
Step 4
Using an electric mixer fitted with the whisk attachment, whip the egg whites on a healthy medium speed. When they look good and frothy, shake in the remaining 1/2 cup (106g) of the granulated sugar a little at a time, while slowly increasing the mixer speed to high. Keep whipping until the egg whites reach sturdy but not firm peaks.
Step 5
Here’s where all your organization pays off. Grab the dry ingredients and whisk them into the yolk mixture. Make sure there are no lumps; nobody likes that. Then use a large rubber spatula to scoop about a third of the whipped egg whites into the batter and whisk to lighten the mixture. Bakers call this a “sacrifice,” so do it with dignity. Add the rest of the egg whites in two additions, folding gently until just combined.
FOR ROUND LAYERS
Step 6
Divide the batter evenly into the two prepared pans, filling each about halfway.
Step 7
Bake until the cakes are golden brown and spring back excitedly when gently pressed and a cake tester inserted into the centers comes out clean, about 25 minutes.
Step 8
Transfer the pans to wire racks. Let the cakes rest in their pans for about 2 minutes, then carefully flip them out onto the racks. (You’ll be surprised by how easily they drop from the pans.) Turn them right side up on the racks and let them cool completely.
FOR A ROULADE
Step 6
Pour the batter into the prepared baking sheet and spread it evenly to the corners with an offset spatula.
Step 7
Bake the roulade until the cake is golden brown and springs back in the center and a cake tester comes out clean, about 16 minutes.
Step 8
When the cake is in the oven, start worrying about how you’re going to cool it. Clear off a substantial section of your counter and spread out a clean, lint-free kitchen towel (at least as big as the baking sheet). Sift a liberal amount confectioners’ sugar over the towel.
Step 9
When the cake is ready, run a knife around the edge of the pan. Invert onto the towel and remove the silicone baking mat or parchment. Dust the top with additional confectioners’ sugar and, beginning at a short end, roll the cake and towel into a tight log.
Step 10
Transfer the cake to a wire rack and let it cool completely.
Recipe excerpt from FRUIT CAKE by Jason Schreiber. © 2020 by Jason Schreiber. Used with permission by William Morrow, and imprint of HarperCollins Publishers. All rights reserved.
Featured Products
Featured Posts





Join the Discussion